
Complete Login / Signup System – MongoDB Atlas
MongoDB Atlas Login: Azure Active Directory and SSO (Azure AD). When you combine Azure AD and MongoDB Atlas – SSO, you can:
Manage access to MongoDB Atlas, the MongoDB community, MongoDB University, and MongoDB Support with Azure AD.
Give your users the option of using their Azure AD accounts to log into MongoDB Atlas – SSO automatically.
Users can be given MongoDB Atlas roles based on which Azure AD groups they belong to.
You may manage all of your accounts through the Azure interface.
What Is MongoDB Atlas?
MongoDB developed and maintained MongoDB Atlas, a cloud-based database service. To assist users in setting up, managing, and securing new databases for their applications, it integrates with hosting services like AWS, Azure, and Google Cloud.
When we deploy our production-ready apps, we’ll use its free service tier to host MongoDB databases for those applications. Visit the MongoDB Atlas website to learn more.
Set Up Account and Initial Database
You’ll need a MongoDB Atlas account to get going.
- To begin the sign-up process, navigate to the MongoDB Atlas sign-up page, which is shown in the following image:
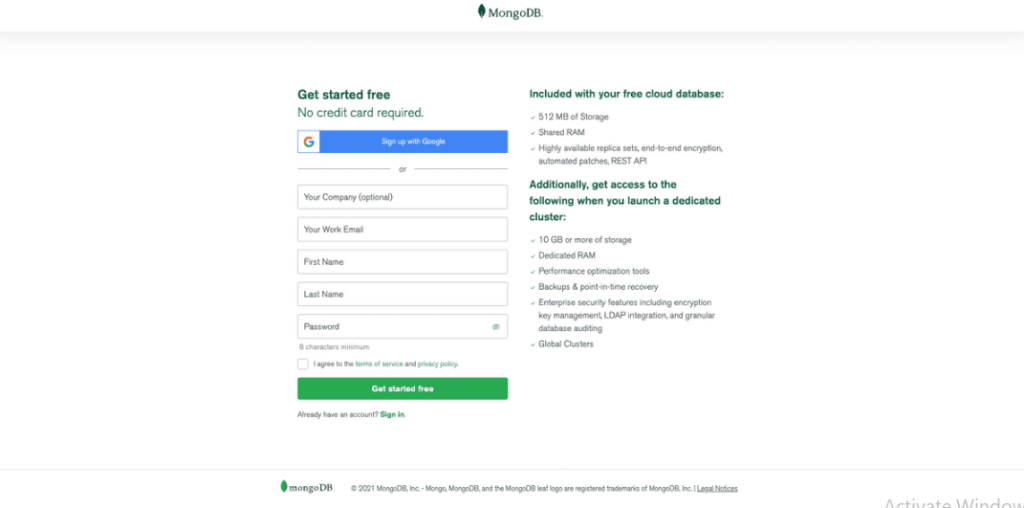
- Fill in the required fields.
- When you’re done, click “Get started free”.
- Next you will be sent an email verification. Verify your email by clicking the “Verify Email” button on that email as shown in the image below:
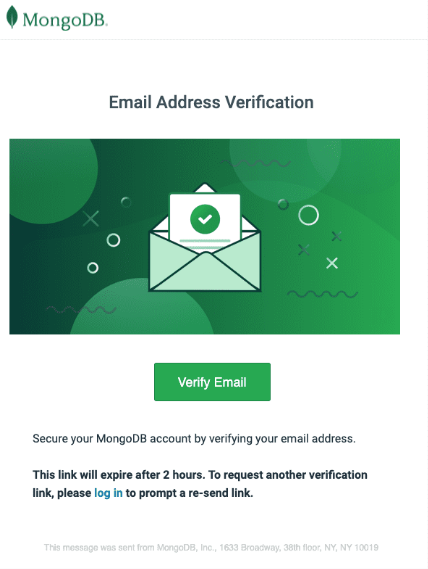
- After verifying your email, head back to the Mongo Login page and login using your credentials.
Welcome to Atlas
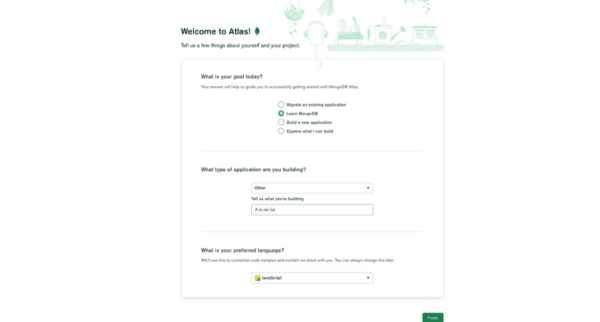
You will get a “Welcome to Atlas!” page when you log in for the first time.
- For “What is your goal today?”, select “Learn MongoDB”.
- For “What type of application are you building?”, select “Other” and type in your project name such as “A to-do list”.
- Finally, select “JavaScript” as your preferred language. Your form should look like the image below:
Create a Cluster
You will be directed to the “Deploy a cloud database” screen after selecting “Finish,” as illustrated in the image below:
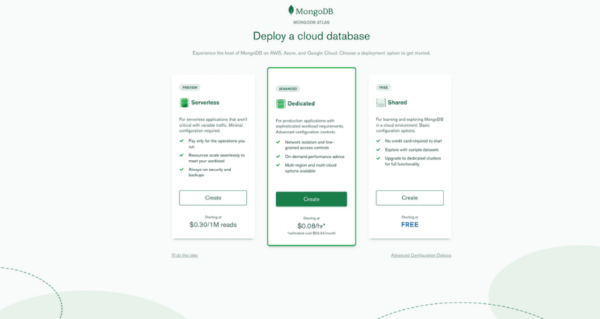
- To start, select the free “Shared” plan.
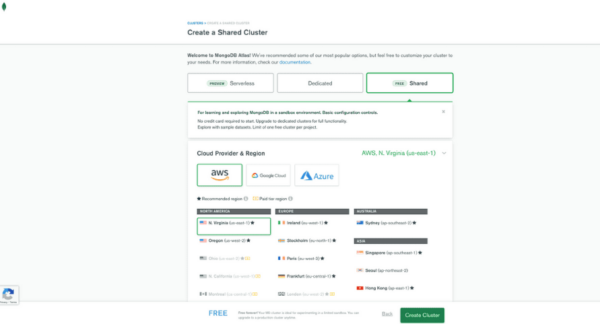
- In the following “Cloud Provider & Region” screen, select “AWS” as the provider. For the region, select the region that is closest to you. If after selecting your provider and nearest region your screen resembles the image below, you can click the green “Create Cluster” button:
Set Up Your MongoDB Atlas Dashboard
You will be led to the “Security Quickstart” because this is the first time you have seen this dashboard. We will manually navigate through the security settings as opposed to using the quickstart.
Add New Database User
Take the following actions to add a new database user:
- On the left-hand navigation menu, under Security, select the “Database Access” link.
- From there, click the “Add New Database User” button. The following image shows the resulting modal with the options you’ll need to select:
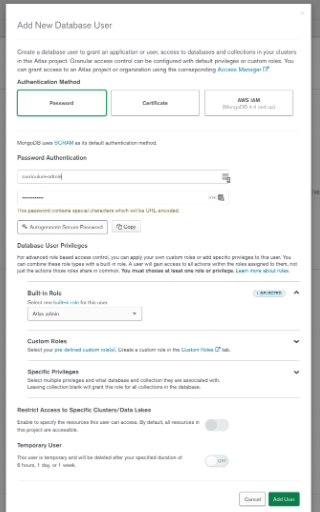
- To fill out the form, follow these steps:
- For “Authentication Method”, choose Password.
- Under “Password Authentication”, create a username and password that you’ll remember.
- Under “Database User Privileges”, select “Atlas admin”.
- Leave any remaining options as default.
- IMPORTANT: Do not enable “Temporary User” unless you want to make a new user every so often.
- When you’re done, click “Add User”.
Connect to An Existing Database
When connecting an existing cluster and database to a new application, take the following actions:
- Click Database under DEPLOYMENT on the left side of the screen.
- Locate your cluster and click the Browse Collections option to view a list of current databases and collections.
- Replace db-name> in the URI string above with the database name you want to connect to.
That’s all there is to it; you can now connect to your database by adding the URI to your application. So that you may use it later, keep this URI somewhere secure.
Allow Your IP Address
You must permit your IP address. The numerous components of this stage are emphasized in the following image:
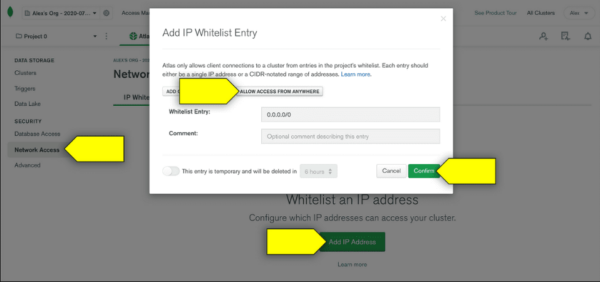
To allow your IP address, follow these steps:
- On the left-hand navigation menu, under Security, click the “Network Access” link.
- Click the “Add IP Address” button. The “Add IP Whitelist Entry” modal will appear.
- To make your database accessible from anywhere, click “Allow Access From Anywhere”. This will set the Whitelist Entry value to “0.0.0.0/0”.
- Click Confirm.
For now, that’s it! You don’t need to connect or add test data just now.
You can now create a production-ready database for deployment after setting up all your accounts.
Configure and test Azure AD SSO for MongoDB Atlas – SSO
Utilizing a test user named B.Simon, configure and test Azure AD SSO with MongoDB Atlas – SSO. You must create a connected relationship between an Azure AD user and the relevant user in MongoDB Atlas – SSO for SSO to function.
Follow these instructions to set up and test Azure AD SSO with MongoDB Atlas – SSO:
- Configure Azure AD SSO to enable your users to use this feature.
- Create an Azure AD test user and test group to test Azure AD single sign-on with B.Simon.
- Assign the Azure AD test user or test group to enable B.Simon to use Azure AD single sign-on.
- Configure MongoDB Atlas SSO to configure the single sign-on settings on the application side.
- Create a MongoDB Atlas SSO test user to have a counterpart of B.Simon in MongoDB Atlas – SSO, linked to the Azure AD representation of the user.
- Test SSO to verify whether the configuration works.
Configure Azure AD SSO
To enable Azure AD SSO in the Azure portal, adhere to these procedures.
1.In the Azure portal, on the MongoDB Atlas – SSO application integration page, find the Manage section. Select single sign-on.
2.On the Select a single sign-on method page, select SAML.
3.On the Set up Single Sign-On with SAML page, select the pencil icon for Basic SAML Configuration to edit the settings.
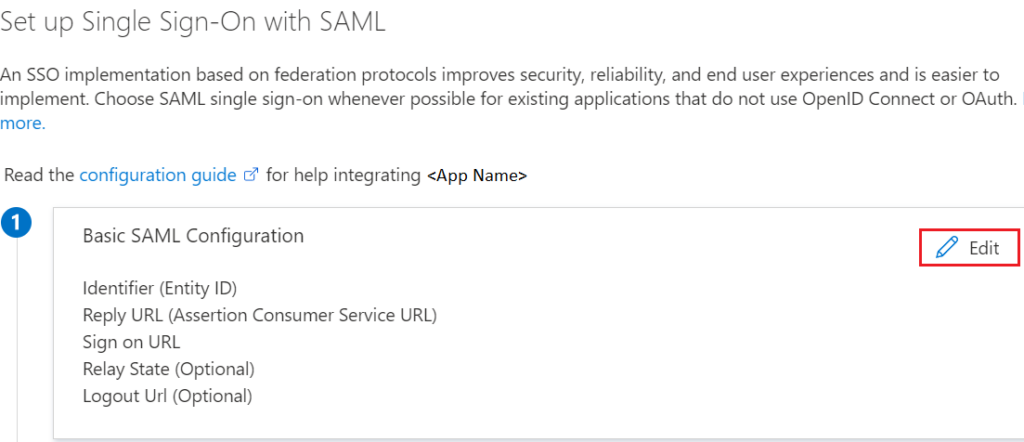
4.In the Basic SAML Configuration section, if you want to configure the application in IDP initiated mode, enter the values for the following fields:a.
- a. In the Identifier text box, type a URL that uses the following pattern:
- https://www.okta.com/saml2/service-provider/<Customer_Unique>
- b. In the Reply URL text box, type a URL that uses the following pattern: https://auth.mongodb.com/sso/saml2/<Customer_Unique>
5.Select Set additional URLs, and perform the following step if you want to configure the application in SP initiated mode:
In the Sign-on URL text box, type a URL that uses the following pattern: https://cloud.mongodb.com/sso/<Customer_Unique>
6.You must add custom attribute mappings to your SAML token attributes configuration because the MongoDB Atlas – SSO application requires the SAML assertions to be in a particular format. The list of default properties is displayed in the snapshot that follows.

7.The MongoDB Atlas: SSO application anticipates a few additional attributes to be returned in the SAML response in addition to the ones listed above. Additionally, pre-populated, these attributes can be modified based on your needs.
| Name | Source attribute |
|---|---|
| user.userprincipalname | |
| firstName | user.givenname |
| lastName | user.surname |
8.Add the following group claim to your SAML assertion if you want to provide useful information about their groups when authorizing users using MongoDB Atlas role mappings.
| Name | Source attribute |
|---|---|
| memberOf | Group ID |
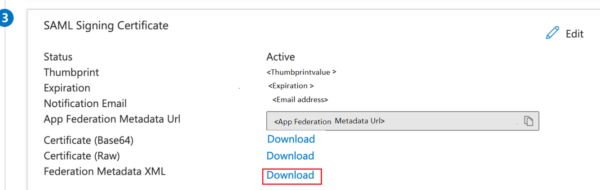
9.Find Federation Metadata XML on the Set up single sign-on with SAML page’s SAML Signing Certificate section. To download and store the certificate on your computer, select Download.
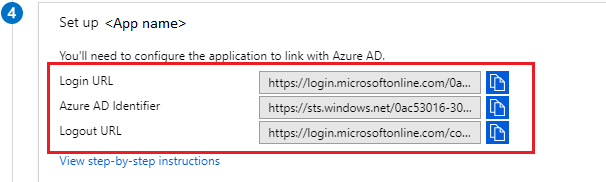
10.Copy the relevant URLs from the Set up MongoDB Atlas – SSO section according to your needs.
Assign the Azure AD test user or test group
By allowing access to MongoDB Atlas – SSO in this area, you’ll make it possible for B. Simon or Group 1 to use Azure single sign-on.
- In the Azure portal, select Enterprise Applications, and then select All applications.
- In the applications list, select MongoDB Atlas – SSO.
- In the app’s overview page, find the Manage section and select Users and groups.
- Select Add user, then select Users and groups in the Add Assignment dialog.
- In the Users and groups dialog, select B.Simon from the Users list or if you are using MongoDB Atla role mappings, select Group 1 from the Groups list; then click the Select button at the bottom of the screen.
- In the Add Assignment dialog, click the Assign button.
Configure MongoDB Atlas SSO
The necessary URLs must be copied from the Azure portal to configure single sign-on on the MongoDB Atlas side.
For your MongoDB Atlas Organization, you must additionally configure the Federation Application.
The documentation for MongoDB Atlas contains instructions. Get in touch with the MongoDB support staff if you need assistance.
Configure MongoDB Atlas Role Mapping
With the aid of MongoDB Atlas role mappings, you may associate an Azure AD group’s Object-IDs with Organization/Project roles in MongoDB Atlas to approve users based on their membership in that group.
The documentation for MongoDB Atlas contains instructions. Get in touch with the MongoDB support staff if you need assistance.
Create a MongoDB Atlas SSO test user
Just-in-time user provisioning is supported by MongoDB Atlas and is turned on by default. There is nothing else you need to do. After authentication, a new user is generated in MongoDB Atlas if one doesn’t already exist.
Test SSO
The following settings are used in this section to test your Azure AD single sign-on configuration.
SP initiated:
- Click on Test this application in Azure portal. This will redirect to MongoDB Atlas Sign-on URL where you can initiate the login flow.
- Go to MongoDB Atlas Sign on URL directly and initiate the login flow from there.
IDP initiated:
- You should be signed in to the MongoDB Atlas for which you configured the SSO automatically when you click Test this application in the Azure portal.
Microsoft My Apps can also test the program in any mode. If configured in SP mode, you will be sent to the application sign-on page to begin the login flow when you click the MongoDB Atlas – SSO tile in the My Apps.
If configured in IDP mode, you should be automatically signed in to the MongoDB Atlas – SSO for which you set up the SSO. See Introduction to the My Apps for additional details on the My Apps.
FAQS
Q.1 How do I use MongoDB Atlas?
ANS. Before utilizing MongoDB Atlas, you must carry out the following: Sign up for a MongoDB Cloud account. Establish a MongoDB Atlas cluster.
Create a cluster user and set up network access. Link up with the group. You won’t need to provide any payment or credit card information because MongoDB Atlas provides a free tier. Let’s get going now!
Q.2 What cloud providers support MongoDB Atlas?
ANS. The infrastructure for MongoDB Atlas is built on top of Amazon Web Services, Microsoft Azure, and Google Cloud Platform; each cloud provider regularly submits to a unique set of independent third-party audits.
AWS has more information about cloud compliance. Learn more about Microsoft Azure about cloud compliance.
Q.3 How do I connect to the MongoDB database?
ANS. First, you must create a MongoDB database user to connect to the database from a script or application. You can connect to and use the databases with the database user.
Please be aware that this differs from the person who logs in and controls the Atlas clusters and resources.
Q.4 What is MongoDB’s document model?
ANS. Because documents map precisely to the objects in your code, MongoDB’s document model is the quickest method to innovate.
They are much simpler and more natural to work with. As you develop new app features, you may store data in any format and change your schema whenever you like.